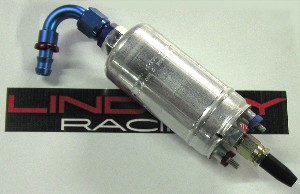
Technical Details
Supercedes the 0 580 254 044
Flows ~10% higher than 044 at 7bar
Weighs 15% less than 044 at 860g
Current draw similar to 044
M18x1.5 inlet fitting and M12x1.5 outlet fitting
External non return valve
Pressure relief valve 8-10bar
Compatible with Gasoline and Diesel
|
This pump does not come with the Blue fittings you see in this picture. You will need this for your
typical 944 chassis installation. Sold separately. When using this fitting, you do not use the factory fuel tank to pump hose. This pump will go anywhere our HV can go but supply more fuel for more HP. See the Manuals tab for install tips and instructions since the wiring is slightly different then the HV or stock 944 and 944T fuel pumps. Fits Models:
|
Tips, Manuals and Instruction
Fuel Pump Install 044 / HV / StockIt's would best to run the fuel level down in the tank to as close to empty as possible if you are going to work with the fuel pump. Time things so when your new pump arrives, your tank is nearly empty. The less fuel you have to deal with the better.CAUTION: You are about to work with fuel (a flammable). Work in a well ventilated area and away from spark or open flame. Make sure the battery is disconnected. If you're going to change the fuel tank to pump supply hose on a stock or HV pump, you will be needing to either drain the fuel tank or have a extra set of hands available to press a finger on the fuel tank outlet. You may squirt a little fuel around in the process so use care, common sense, and take precautions. If installing a 044 pump where it's necessary to change the supply hose, take measures to block off the fuel flow once you remove the original pump like mentioned above. If changing the tank sock, you will need to drain the tank completely. Support Strap Remove the 13mm Tank Strap bolt. The other end is hinged so let it hang down. Inspection Cover Remove the two Phillips head screws and slip out the inspection cover. Visual Inspection What you're looking at here is our HV Fuel pump previously installed in this car. In this instruction, we are going to remove this and install a 044 Pump. Most steps are the same installing a HV or replacement Stock fuel pump. The HV pump retains the fuel stock supply hose you see here between the fuel tank outlet and the fuel pump inlet and the electrical connections are identical. Remove Fuel Pump Disconnect the power (7mm) and ground (8mm) nuts. Loosen the hose clamp at the fuel pump inlet hose and slip it down the hose. Pinch off the fuel supply line from the fuel tank. A pair of vise grips works well. You can place a couple of pennies on the top and bottom of the hose before you pinch it to make for a wider area for the vise grips to squeeze the hose completely off and protect the hose form the vise grip jaws teeth. Remove the cap nut on the fuel pump outlet. Slip off the fuel outlet banjo fitting, the wire terminals, and pull the fuel pump out of the fuel supply hose. If you're installing a Stock fuel pump, or our HV pump, and don't plan to change the fuel filter or pick-up sock, this is where you swap the pump and start putting things back together. Changing Fuel Tank Pickup w/Filter If you wish to change this part , here is the technique. What we don't show is we installed a 3/4" ID hose about 2 feet long over the outside of the fuel-to-tank supply hose and stuck the end in a 6 gallon gasoline storage can. Then we removed the vise grips and drained the fuel tank. With the fuel tank drained, simply put a 17mm deep socket on the fitting to unscrew it. Make sure the new supplied rubber gasket is in place on the replacement part and re-install and tighten. This is the PERFECT time to install a new fuel filter. You will need two 19mm and one 17mm wrench or equivalent. HV next to 044 Pump Here you see the new 044 Fuel Pump (bottom) along side the HV pump we removed from the car. Assembled for Install There is another modification you can do at this point if your want to. See the end of this instruction for the optional mods. This shows the pump ready to install. We have placed a piece of silicone hose over the pump to allow as a anti vibration cushion. The factory original black cushion will not work on the HV or 044 pump so you need to improvise. Make sure the aluminum sealing ring is installed between the fuel pump inlet and the adapter fitting. Here we used a 2" long piece of 1/2" ID hose as the tank to 044 Pump fuel supply line. We recommend high pressure fuel line hose. In this picture it's silicone, which we later found to swell with fuel. Final Connections and Installation Position The electrical posts on the Stock Fuel Pump and the HV Fuel Pump are opposite the 044 pump. On the 044 pump, the larger terminal is the Power, where on the HV and Stock pump, it's the negative. You will need to enlarge the terminal on the green wire which is the positive. The stud on the pump is 6mm. We held the terminal near the ring end with a pair of needle nose pliers and drilled through it's ring with very light pressure careful not to snag. The old nut from the Negative terminal can be used on the negative post on the 044 pump. The Positive terminal on the 044 pump will require a new M6 x 1.00 nut and a washer. Ready to Install Main Cover Rubber terminal boots are placed back over the terminals. The clamps are tightened on the 1/2" supply hose. It's ready to re-install the cover main cover and support strap. Ready for Inspection Cover
Before you re-install the inspection cover, check to see if the hose between the fuel tank outlet and the fuel pump inlet is relaxed. Adjust the fitting or hose clamp holding the pump to the main cover to insure it is not bound or twisted. Install inspection cover and re-install Phillips screws. Optional ModificationsOne thing about the stock pump, our HV pump or the 044 pump is the size of the passage through the one way check valve. The size of the opening is 1/8" or .125". So this really is the limiting factor of what that fuel pump will flow. Open up the holes, or remove the fitting and install an alternative, will allow for more fuel flow with the same pump. In the picture below, you can see the hole size comparison from the stock check valve on the left, to the modified one on the right. The check valve is not necessary in the system. Your fuel pressure will dwindle down when the car is off, and it may take a couple more cranks to get it started, but other then that, there is no downside to not doing this modification. Here we are using a 9/32" (.281") drill bit all the way through the part. Below we are about to enlarge the 4 holes on the side of the banjo fitting using a 5/32" drill bit. Below you see the stock check valve on the left, and the modified check valve on the right. The fitting on the left side of the picture came on the 044 pump and is used between the check valve and the pump body. We remove this adapter as the hole through it is slightly smaller then our modified valve and it's not necessary to be there regardless. If your still chasing restrictions, this is the inlet fitting on the 944 fuel filter. It's also 9/32 or .281" in diameter. You could drill this out as well although the filter itself has a hole of similar size in it. You have to drill that to. And since that's the same size as the new hole in the check valve, it's all sized equally. Ideally you can rid yourself of the filter restriction by our Fuel Pump to Rail line kit which uses a entirely different filter with more flow capacity.
|
Product Videos


